Monday 26 July 2010

Muster for Battle!

With the tournament only a week away, i have arrayed my chosen force ready for inspection! Elements of this army have been well used for gaming, and may require a bit of a touch up before being presented for competitive game play!

This is the 2000pt Kreig force that i will be using. I'll also be using a Vostroyan 1000pt and 1500pt force as well as part of the campaign weekend (pictures of them to follow later) Yes, there is a Macharius Super Heavy in there, but this comes under the special rules that the organisers of the tournament have layed out.


There are also some shots of my Company Command Platoon (HQ squad and lascannon teams) as well as my Engineers and Hades Breaching Drill. The Breaching Drill allows the Engineers to deep strike onto the battlefield, while being equipped with S10 Power Blades and a Melta Cutter! This is then followed up by a squad of tooled-up engineers...nasty (well, i hope!) You can also see the Heavy Mortar Battery and the Medusa Siege Gun, part of the Kreigs favored arsenal!

I was a bit worried that this list was a bit light on foot sloggers for a foot sloggers army! I seem to have gone for the more specialist units, mainly investing points into the engineers and their drill. I will be taking along a few more troop squads in case i change my mind on that (which is allowed, as your allowed up to 5 lists - currently i have 3!)


Pictures of the Vostroyan forces to follow, and then hopefully some good results from the tournament!

Sunday 25 July 2010

Valkerie Airbourne!

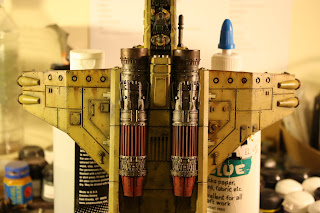
The base for this Valkerie is complete. Looks good, think I'll be using the Milliput for all my bases now! Just kept it simple with a few blast craters and barbed wire - it is a desert base after all!


I haven't put any transfers or markings on the Valkerie yet, as i haven't decided on the squad designations/markings which i wanted to match to their transports. I have the other 3 squads needed not (unpainted as yet) so I'll get all that kind of thing done once they are complete.

On the table now is my HQ command squad, which I'll make a start on next week.

Thursday 22 July 2010

Finnished Grenadier Centaurs - a Disappointing Result.....

Well, they're both done and dusted, but as the title suggests I'm not really happy. This is specifically because i couldn't get two of the crew into the Centaurs. The Top-side Gunner and the Sergeant. There's simply not enough room! I started to force them, but i decided against that, and just went with the four crewmen. A shame really.


The overall result is good i suppose, but I'm just really disappointed!! On a positive note, i decided to try out the Quickshade on the crewmen (out of curiosity, but mainly because i was feeling lazy!) For those who haven't read my other blog, Quickshade is made by Army Painter and is bloody brilliant! Simply dip your miniature into the Quickshade and shake off the excess and you've got a fully shaded model which is also varnished. The effect was great on the Kreig, and future models will definitely be seeing a dip into the Quickshade!


Now that the whole army's done, I'll get a group shot done and up on the blog!

Wednesday 21 July 2010

Valkerie Base

My poor Elysians have been neglected somewhat of late, due to a deadline i need to make with my Krieg (tournament at the end of the month!). I did find time to make a start on the scenic base for the Valkerie i recently completed.


I saw a post a while ago (cant remember the blog) where the guy used Milliput to create a textured base over which a sandy layer can be applied. I decided to give this a go. Once its dry I'll chuck on some sand and spray it! Can finally get me bird flying!

On another note, i received a large order of Elysian troops the other day, and what you see here is my HQ Command Squad undercoated in the Army Painter spray i mentioned a few posts back. I'm very happy with the colour on the resin, and i intend to apply all the base colours and then dip them in the Strong Tone for shading. I figured that if it all goes wrong then its only on a 5 man squad that i can probably sell on eBay!!

The Kreig that you can see drying in the background are my other unwilling guinea pigs for this technique, so I'm really hoping it'll turn out well! More on that when i have it!!

Laters


Monday 19 July 2010

Finished Grenadier Centaurs

These guys didn't take that long to complete, but i could've had them done sooner if work hadn't kept getting in the way!! Never mind!


Today i made a start on the crews for these Centaurs, 6 men in each Centaur. I hope to have these compete by the end of Wednesday, by which time the whole army will be complete!! WOW! Well, by complete i mean Ive fulfilled the list i set out to create, but I'm quite sure ill be painting Death Korps for many years afterwards!

Tuesday 13 July 2010

Valkerie Progress 2 - to Weather a Valkerie.....

Right, after a frantic day of painting Krieg, I spent the last few hours of the day on my Elysian Valkerie.

In my last post i said i would document the techniques used to weather this bird, and this is what i have for you today. These techniques are taken from Imperial Armour Masterclass from Forgeworld - a book i highly recommend!! These techniques are transferable to all vehicles and colour scheme, so i hope you will all find it helpful!

The first thing i wanted to do was create a chipped effect on the paintwork. As you can see, the Valkerie is far to clean and pristine!


To do this, take a piece of foam (any will do but carry case foam is particularly good) Dip the edge of the foam into some Charadon Granite foundation paint. This could will act as the base colour of the metal that lies underneath the paint job. Wipe off the excess paint so you have just a little bit more paint than you would normally use for a drybrush.


Then gently apply the paint using the foam to the areas of the Valkerie that are likely to see wear and tear. These are usually the edges of the hull, access ramps/ladders, moving parts etc. You can also apply chipping to areas of the hull that need breaking up a bit, but this is entirely up to you.


The finished result should look something like this.


Already the Valkerie looks weathered and beaten. You could leave the weathering here at this stage if you wanted! However, i like to go for that little extra bit of realism and add even more weathering.

Get hold of some oil paints. I use Winton Oils paint, as they are available in pretty much every hobby store you go into! For this Valkyrie i have got a Burnt Umber (brown) and Lamp Black (well, black). These two colours will simulate the build up of soot/smoke and oil on the hull. You do not want to apply them directly though, as the colour will be far to strong! Dilute the colours using white spirit. The thinner the dilution the weaker the colour, and vice versa. Theres not set amount for the dilution so you'll just have to experiment a little until you get the right mix.


Once you are satisfied, apply the black to areas that are likely to accumulate soot and muck (all hull creases, rivets, engine parts, etc) This is a terribly easy part of the process, as the mix will just run around the rivets and creases very easily, leaving behind a deposit of your thinned out oil paint.


A cool effect that's good on skimmers and flyers is some directional weathering (don't know if that's a term, but if not i just coined it!). This represents the collective muck being dragged across the surface of the hull by wind shear. For this part i stood the Valkerie on its tail so gravity could help me out a bit!

Gently drag some of your oil paint mix across the areas of the hull that you want the weathering. In this case i used the edges of the wings. You will need a stronger mix for this part, or if your careful, neat oil paint. Once you have applied the paint, put some white spirit in an airbrush. Now gently spray white spirit over the area that you just applied the paint. It will slowly start to diffuse and hopefully run down the wing, leaving a paint-snail trail as it goes. If you don't own an airbrush, then use a paintbrush dipped in white spirit and carefully drag the paint down in the desired direction until you get the desired effect.


Hopefully you ll end up with something like this:


The technique can also be used to 'burn' areas of the hull that might see extreme heat. In this instance i used the black mix to represent soot and exhaust fumes discolouring the tail wings on the Valkyrie.


Right that's it! Hopefully you'll end up with a Valkerie that looks a little something like this:


As you can see these methods are very easy, and make a hell of a difference to your vehicles. For me it really brings them alive!

I hope it all made sense, and i hope you find a use for these techniques! If you have any questions at all, please ask!

Laters

Grenadier Squads Complete, Spine Replacement on Order!

After a frantic and back breaking day of painting, my two 5 man Grenadier Squads are complete. Very happy with the colour scheme, but a little unhappy with the Hellguns. The casts for the weapons were a bit chunky and undetailed, but i hope it doesn't show to much.

I then had to move straight on to the Centaurs!! I didn't get very far though, I'd had my fill of painting for the day! At least they're assembled and undercoated. I'll move onto the painting tomorrow. For anyone who hasn't seen one of these in the flesh, i took a picture of their scale to show how unbelievably small they are!!

Now, off to the Chiropractors.....


Monday 12 July 2010

Back to the Kreig - Grenadiers

Forgeworld finally managed to get their finger out! Today i received my two Grenadier Squads, Grenadier Special Weapons, and two Grenadier Centaurs. These will complete my 1750pts army list, and also my list for a tournament I'm attending in Bristol at the end of the month. This leaves me with only 3 weeks to complete the lot.....

I pressed on with the two 5 man squads that will be ridding in the Centaurs. Four Grenadiers with Hellguns, one Demo charge, and one with a Melta in each squad. Hopefully I'll have these guys finished tomorrow, and then I'll move straight on to the Centaurs. Busy Busy Busy!!

Laters

Valkerie 1 Progress

Today i completed laying down all the base colours for this Valkerie. And not as minute to soon, as my HQ and Platoon Command Squads arrived today, with a second Elysian Squad being dispatched on Friday. I used the Primer i got from Army Painter as the base colour for this Valkerie (mentioned in my last post) as I'm very pleased with it! Furthermore when i came to touch up the hull after painting the base colours, i found that it was a virtually identical colour to GW's Desert Yellow, which is what i use for the combats on the Elysians. This is good because it will save me a lot of time when churning out my squads!!

I just have the weathering to do on this bad boy, and then I'll move on to the scenic base! Looks like this regiment is getting off the ground!

As i apply the weathering, I'll also be putting together a tutorial on my methods (i recently completed a similar one on my Krieg Blog). Hopefully the techniques will be of some use to you all!
Would love to get some feedback on this birds colour scheme as I've got another four of these to do, as well as a Vulture, so i want to get it right!

Laters

Sunday 11 July 2010

On the Table/Landing Pad.....

While I wait for my Krieggy Boys to arrive, I've resumed my work on the first of five Elysian Valkeries! This evening i finished off the interior and constructed the Valkerie itself. With any luck I'll get it sprayed with the new Army Painter Primer I mentioned in my previous post and get the base colours on tomorrow. I've also had a good idea for the scenic base, which was inspired by another blog post i found, but more on that later!

Laters


Friday 9 July 2010

Finished Vostroyan Sentinels

Well, as the title suggests, the Vostroyan Sentinels are complete. The two Sentinels I currently own are the old Armoured versions, but these two were the new kits, and I was very impressed! I love the Sentinel as a unit but more as a model. Its one of my favorites, and the new kit has really done it justice! I hope it shows in these pictures!

After giving Forgeworld a royal ear-bashing yesterday about the lateness of my 'Express Delivery' order, my Kreggy boys and some of my Elysians will arrive tomorrow. Work will have to begin immediately if I'm going to get the Krieg units complete by the end of the month! Watch this space!

Laters


Thursday 8 July 2010

On the Table Now.....

After being bitten by the tournament bug back in May, I've been invited to my second tournament by a mate! It is the Bristol Vanguard tournament, and is taking place on the 31st July and the 1st August.

There are three different point limits, and each player must have a list for each limit. These are 1000pts, 1500pts, and 2000pts. 5 battles are to be played by each player, and the points will vary between the values mentioned above. This only causes some minor list problems for me, but unfortunately, some very large financial problems! Reason being, I'm entering my Vostroyan Firstborn for the 1000pts and 1500pts, and my Kreiggy Boys for the 2000pts!

For the Kreiggy Boys I need 2 Grenadier Centaurs, 2 Grenadier Squads, and 2 Grenadier Special Weapons. These are on their way as we speak (if Forgeworld have managed to be slightly less incompetent than they usually are!!) For the Vosties I only need 2 Armoured Sentinels, which are on the table now!

The Sentinels are both the armoured variant and both are armed with Plasma Canons. I got as far as building and basing them today, and hope to start painting tomorrow. With any luck the Forgeworld will be here tomorrow (along with another Squad of Elysians and a HQ and Platoon command squad - check out my other blog for details on that!)

Laters

Tuesday 6 July 2010

Army Painter - A Quick Product Review

I was reading a product review of the Army Painter product range on another blog the other day (I forget which!) and decided to give it a try. For those who haven't heard of Army Painter, its a company that manufactures spray primers in a wide variety of colours, as well as other useful painting gubbins! The two products that I decided to purchase were the Spray Primer Desert Yellow, and the Quickshade: Strong Tone. I wanted to try and use these products to speed up the painting process for my Elysians. Although i do own an airbrush, i find using it is not always as straight forward as it seems, and problems frequently occur.

Firstly, the spray primer. Well, it does exactly what it says on the tin! Its simply a spray paint of your chosen colour, of which Army Painter offers a large range. Instead of undercoating, then base coating your models, this product does it in one spray. Nice, neat, and simple.


The second product is Quickshade. This is a product designed for shading your models by dipping them straight into the pot of Quickshade! The product comes in three strengths, and i went for the middle one, Strong Tone. Now, I've never been a fan of "dipping" but the results were quite convincing. The Quickshade is also a gloss varnish, eliminating another stage of your painting process. The only problem with this is that you may not want a gloss varnish on your models. I know i certainly don't! However, the gloss effect can be countered with the application of a Matt Varnish over the top (I used the GW one) This effectively gives you a double layer of varnish, hopefully making your models more durable.


The Quickshade is meant to be used once all of your base colours are on the model. I guess the highlights can be added before or after the Quickshade, this down to personal preference. Once the model is dipped, you must shake or wipe off the excess. If you don't you will get localised areas of very strong shading, which can look a bit rubbish!

To see the results for myself, i used an old 1st Ed Space Hulk Genestealer! I'm not quite brave enough to crack on straight away with my beloved Forgeworld models! The pictures below show the model after being sprayed with Primer and then dipped in the Quickshade. In this example, I'm very happy with the result! I have some more squads arriving tomorrow, both Elysian and Krieg (see my other blog for the Kreig!), so i hope to apply these products for real soon!


I hope this has been helpful to you all, and i strongly recommend you check out Army Painters website and take a look! Enjoy!