Showing posts with label Mechanicum. Show all posts

Friday, 15 April 2016

Blessings of the Omnissiah: Ordinatus Ulator Complete!

The last WIP post on the Ordinatus Ulator saw the monster nearly completed. Since then i've added some minor finishing touches (but still not the crew, they'll have to wait!!)

Apologies in advance for the encroaching white of the light box - the beast was just to big for it to handle! And also for the lack of text, i'll let the pictures do the talking!


I finished off the control screens with some more shading t make them pop a bit more. I admittedly wasn't brave enough to freehand some detail onto them!


To finish off the tracks i hit them with some MIG weathering powder like the other Mechanicum Tanks.


Next up - Alpha Legion Sicarian!

The GunGrave

Thursday, 24 March 2016

Blessings of the Omnissiah: Ordinatus Ulator WIP 2

Phew, it seem's that i have finally managed to wriggle free of the Hydra's coils for a few moments and get some more work done on the Mechanicum Ordinatus! By some work i mean nearly finished!


Its come a long way since my last post, with all of the base colors down, along with washes, second coats, and highlights. Below you can see the sponson mounted Volkite Culverins that the Ordinatus packs. I have magnetized these purely for ease of transport as they're likely to ping off if glued on.


The main drive unit is complete.


The main weapon carriage is also mostly complete - and i have to say it is rather impressive!


These bits were rather fiddly to paint, even un-assembled.


I followed the Forgeworld's painted example of the Ordinatus fairly closely, but did decide to add some extra brass trim to the main weapon.


The control console is also sporting a Volkite Culverin turret!


I left the weapon un-glued for easy removal. The join meant that i didn't have to magnetize this weapon. You can see the control console a bit better here. I'd like to add some detail to the display screens before i'm finished.


This is the targeting array. I had a lot of frustration with the lenses of the array, i just couldn't get them right! I'm happy with the blue lens, but the red and green lens may see some more attention before i'm done.


The array has also been magnetized for transportation purposes.


Very close to completion now! Just have to do the bits that are still bugging me (lens, display consoles) and the two Mechanicum crew.

The GunGrave

Wednesday, 9 March 2016

Blessings of the Omnissiah: Ordinatus Ulator WIP 1

Somehow, a Mechanicum Ordinatus Ulator made its way into my Alpha Legion order recently....To this day i still don't know how that happened, Perhaps a gift from the Hydra! So, not being one to question these things, i began working! The Alpha Legion will  have to go on the back burner for the time being.

I have loved this model since seeing it at the 2015 HH weekender when it just looked like this:


To be fair, it hasn't changed much since that imaged was shown that weekend so my love for it hadn't diminished. Now just over a year later, I've got one of my own on the go. Oh, and if you haven't read the rules for this beast, go and do it NOW! Its a monster on the field, the bane of tanks and armor at huge distances!

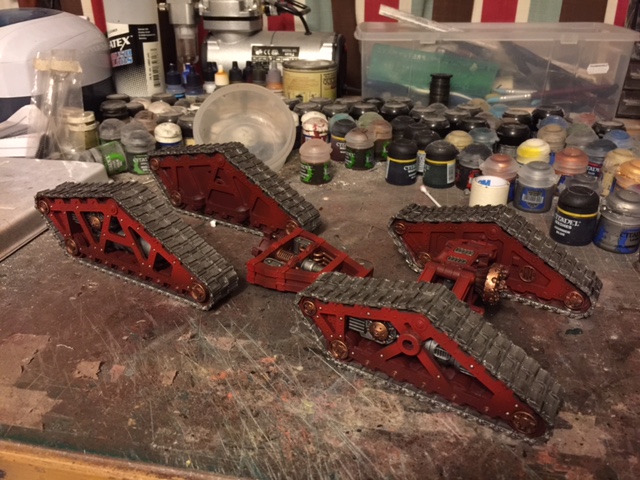
I had a half day at work recently so i managed an epic afternoon of assembling and painting and got this far (I had prepared all the parts the night before though)


Its about a foot long, fitting for a tractor on steroids carrying a titan-class weapon on its back! Its full of detail of course and maintains the great visual cues that are found throughout the Heresy Mechanicum range.

These are the parts for the weapon itself (a Sonic Disruptor if memory serves) I should be making a start on these parts soon. as the Mechanicum models are so detailed, i'm having to paint most of the parts before assembly, which is lengthening the process somewhat.


More soon!

The GunGrave

Wednesday, 21 October 2015

Blessings of the Omnissiah: Questoris Knight Styrix Complete!

Another mighty Knight is ready to fight for the Mechaniucm! The second Styrix is now complete. All the weapons are magnetised as usual!


The red armour plates received the same black - red shading treatment as the rest of the Mechanicum Knights.


The fantastic bronze carapace maintains the strong visual link with the rest of the Mechanicum force.


I went with something a little different with the shoulder plates of this Styrix. The lower two plates on the shoulders had hazard stripes applied. These were a royal pain to apply, but after 4 attempts i managed to get a result i was happy with! I'm glad i went with it though.


The armour on the legs was kept mostly red this time. I'll be relying on the still-to-be-released Mechanicum transfer sheets to break up  the colour.


The Hekaton Siege Claw. Modelled with its claws more open than the last - i wanted to make it look like it was using its Irad Cleanser on some unfortunate enemy troops!


The fearsome Volkite Chieorovile!


Here are the 2 Styrix together! Apologies for the picture, it was impossible to get both Knights into the light box without a bit of the white edges creeping in!!


Time to get them out killing! Only 1 Knight remains in the meantime; a Knight Errant!

The GunGrave

Monday, 5 October 2015

Hazard Stripe Tutorial

So before i did the hazard stripes on the second Knigt Styrix, i did a bit of research on how i could jazz up the stripes. They would draw a lot of attention from the eye as they contrast so starkly with the red of the hull, so i wanted them to be a bit more special.

The tutorial i decided to follow was from Spikey Bits blog. I loved the technique, although long winded, and really wanted to give it a go. You'll need an airbrush and some suitable paints to use in it.

First up i had to tape up the shoulder plating. this was no easy task over an uneven and curved surface! In light of this i know the stripes arn't perfectly straight. But by the end of the process (and this was actually my 3rd attempt at successfully hazard striping these pieces!) I'd had enough!


So first stage was a layer of Vallejo Game Air  Beastly Brown. Black is far to dark to apply yellow straight over, so you need to build it up from black to make sure the yellow actually looks yellow!


Next was Leather Brown.


Now it was time for a bit of yellow. A layer of Gold Yellow was  next. I was careful to leave a bit of the brown showing at the edges of the stripes to create some contrast.


Now, to make sure the yellow achieves  its full colour a layer of Dead White was applied over the yellow, again carefully leaving some darkness at the edges.


A second pass of Gold Yellow. You can see the difference here from the first pass of yellow.


Now we've had 4 passes of colour with the airbrush so the contrast could be a little overpowered by now. To make sure I got the contrast i wanted, i gave the edges if the stripes a thin pass of Beastly Brown again.


Then i softened up the edges of the contrast with some more Gold Yellow. Looking back i think i should've been braver with the contrast here - i think i didn't leave enough brown.


And that's it! It does seem a bit of a long winded process, but the layers of paint are so thin they dry quite quickly. I sped things up a bit with a pass with Mrs GunGraves hairdryer between layers.

It looks a little messy at this stage...


But once i got the trim on it looked a lot better!


If i have occasion to do this again then i would definitely make more of an effort on the contrast. Not bad for a first attempt though! I'm looking forward to finishing the Knight and seeing the plates on properly.

The GunGrave

Monday, 28 September 2015

Mechanicum Knight Styrix 2 WIP

Its that time again, time for more Knight action! This is the second of the planned Knight Styrix for the Mechanicum army, and the penultimate knight for the force with just a Knight Errant remaining) I've had a fair bit of practise of painting Knights this year, so I've managed to make good progress in a short amount of time. 

The main body has the base colours on.


 The armour plates have most of the base colours on and also waiting for washes.


weapons are ready for washing. The weapons are magnetised of course.


By the time this post went up the main body had been washed and now is waiting for the final drybrush and highlights.


In other Mechanicum news, i bought some foam trays especially for the Mechanicum. This set me back a rather nasty £70 for 5 trays from KR Multicase, but was pretty happy once the trays were plucked and the models were in. I took these guys for a run out a few weeks ago and the journey to the FLGS and back resulted in 8 breakages!! That's what prompted the purchase so i hope they will help protect my beloved Mechanicum!


More Knight progress soon.

The GunGrave