I've often benefited from reading someones helpful tutorial on their blog. It occurred to me that i haven't contributed to the blogging community with a helpful (or unhelpful!) tutorial of my own!
I've been asked once or twice at my gaming club how i weathered my Kreig tanks. This will now form the basis of my first tutorial! I hope fellow Korpsmen and gamers at large will benefit from this as well!
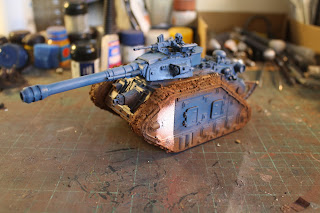
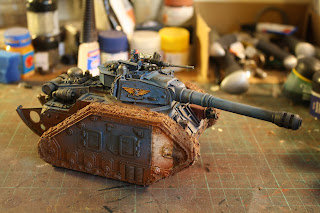
The Forgeworld Mars Alpha Pattern Vanquisher - quite possibly the coolest of all tanks! Firstly i undercoated the tank in Shadow Grey using an airgun. Afterwards i applied the mud to the tracks. This was done by mixing Horby Railway Scenics sawdust with some PVA glue. This makes quite a satisfying gloop that makes excellent mud! Apply liberally!
Once the 'mud' has dried, i then added the camouflaged stripes to the hull of the tank. This was done by applying a mix of 2:1 Regal Blue : Codex Grey with an airbrush.
Once the camouflage had dried, i moved on to paint the mud. This was a simple application of Bestial Brown with an airbrush, applied to the tracks and the immediate hull areas around the tracks (mud splatter) At this stage i also applied a white vertical stripe to the front section of the hull to signify company markings. For this i just made a template out of paper and placed it over the hull of the tank, and used a Skull White spray.
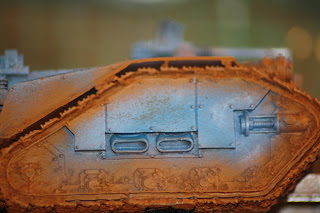
Next i wanted to create a chipped paint look. This technique was taken from the Imperial Armour Masterclass book (which i highly recommend by the way!)
Take a sponge; the foam out of a carry case is very good! Then coat the end of it in some Charadon Granite and wipe off the excess. Gently apply the paint using the foam to the areas of the hull which are likely to be worn (hull edges, hand rails, hatches, etc) This gives the paintwork a great chipped effect! I actually used a Centaur for this example. The photos of the actual Vanquisher didn't come out to well!
Once the hull is suitably 'chippy', the rest of the hull needs to be weathered and looking, like its been kicking ass in the field for a while!
Again, this tip is taken from IA Masterclass and is quite invaluable when weathering tanks. Firstly you'll need to get hold of some Winton Oil Paints, in this case Burnt Umber and Lamp Black. Next, a suitable mixing surface. You will need to apply a small amount of the oil paint onto your mixing surface and dilute it with white spirit. The dilution is totally up to you, but the thinner the mix, the lighter the weathering you'll achieve. The thicker the mix, the heavier the effect (which can look crappy) Its a case of trial and error, but keep at it!
Once your happy with your mix, apply it to all the rivets, creases, nooks and crannies on the tank. It'll look like the accumulated dirt and oil of many days in the field, and give the tank and excellent weathered look!
For the Vanquisher i used the Burnt Umber mix for the hull, and the Lamp Black for all the metallic areas. It works equally well on both surfaces.
That's it for the weathering! Finnish off the details on the tank and your done! For the end of the barrel i used MIG Weathering powder (the forgeworld ones would also do) A very quick and easy way to effectively weather your tanks. All this can be done in just an hour or two (or three!) and the results are quite satisfying. Please feel free to ask any questions! Enjoy!


Hi, jen here, you played me at spoils over the weekend. I love this weathering tutorial, especially the mud on the tracks. I'm going to be attempting the same kind of thing on my ork trukks and battlewagon.
ReplyDeleteThanks for the inspiration!, keep up the good work!