Monday, 31 October 2011

Apocalypse Terrain: Aqueduct Pt1

Remember a few posts ago i showed you some of the bits i picked up from the DIY store? Well they've been put to good use!

This is the Aqueduct! This terrain piece is entirely modular and is part of the larger Apocalypse Terrain Project: Promethium Refinery! I'll explain a bit more about that in the next post! So this is where i am at the moment:


The straight section is 2ft long, and the pipes are about 40mm in diameter. Suitably large for Apoc' games, but could also be used i 40K as well.


The supports are made of plastic H-Beam glued to a hardwood base. The spikes are from the GW building sets.


This is the end section; one of two that I've made. 


The connectors will be left loose for this terrain piece, enabling full customisation! I'll probably be adding more imaginative pieces in the future as well. 


The connectors for the straight sections will also be left loose. The insides have this ridge-stopper-thing which is quite helpful! The 45degree connectors have them to. 


That's it for the mo'! I've got enough materials to make another 2 straight sections, which will give me roughly 6-7ft of Aqueduct in total! Sweet! Painting will begin later today, and expect to see Logan Grimnar up here soon as well!

The GunGrave

Friday, 28 October 2011

Vlka Fenryka - Arjac Rockfist Complete

The poor guys finally been completed, after weeks of neglect!


Cloak and pelt details. The Anvil from a fantasy Dwarf banner top is just perfect!


 I made Arjac a Blonde-Bombshell to make him stand out a little more! The usual grey i use for beards gets a bit boring!


Here is Arjac with the rest of his squad. They'll be deployed via Drop Pod in games! They should pack quite a punch!


This army is rapidly approaching completion, and i'm eager to try it out on the table top! Next up is Logan Grimnar, followed by a Long Fang Squad and a Lone Wolf. More on them next week.

Until Next Winter.....

The GunGrave


Wednesday, 26 October 2011

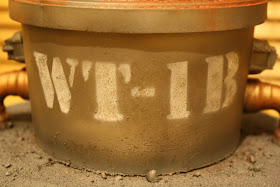
Sewage Processors WT-1B and WT-1C Completed!

Here they are in all their disgusting glory!


Same paint scheme to match the larger processor. The stencils came out really well again!


I added some rust detailing on these smaller processors using MIG weathering powders.


More of Army Painters Quickshade 'Strong Tone' for the water effects.


Here's a shot of all the processors together, and some more helpful volunteers from the Vostroyan Firstborn!


Because these terrain pieces are so large, it wouldn't take much more terrain to fill a 6x4 board. With this in mind, I'm considering making a few more 'sewage/water treatment' themed pieces to go with this lot. I may make some more processors if the right materials come my way, but i think I'll try doing some of the more common processors that are submerged into the ground. A control station/building may also be on the cards!

But before all that, i need to finish off poor Arjac! With a day off on Friday, I'll get him squared away before i start anything else!


The GunGrave

Monday, 24 October 2011

More Sewage Processors WIP!

After the success of the large Sewage Processor, i knew i wouldn't be able o leave the other two containers alone for long! Poor Arjac Rockfist had to remain half finished for the weekend!

The two secondary processors are now done and ready to be painted. Much the same as their larger predecessor, with the exception of ladders instead of metal rungs for the access. This is because the ladders were a perfect fit, and it saved me a tonne of work! 


Yesterday i went down to B&Q (a large DIY store for our American cousins!) to try and find some shelving for my growing collection of terrain! Unfortunately i was unable to find any reasonably priced shelving, but i did find loads of cool bits and pieces in the plumbing section! The red balls and cylinders are usually found bobbing around in water tanks or toilet cisterns, but will make excellent liquid/gas storage containers! All for a £1 each!!

The 2M lengths of plastic plumbing (only £2.50 each!) and the white bits beside them are going to be part of the next Apocalypse Terrain: Promethium Refinery project! At 40mm diameter, the pipes are huge (for 40K scale anyways!!) and will carry whatever materials are needed to refine Promethium in the 41st millennium. For the purpose of the project it will be termed the Aqueduct. More on that in the next week or two!


Finally, I managed to complete my quest for the perfect terrain storage box! You obviously wouldn't have been aware that this quest was in progress, but I never realised how hard it was to find a rectangular plastic box with straight sides!! Theres always stupid and unnecessary indents in the ends and a multitude of  other annoyances! Now the search is over, and the "Battlefield-In-A-Box" project can get started! More on that as well in the next week or two as well!


Phew! Thats your lot for now! As you can tell, i'm well into terrain building at the moment, and may be for some weeks! I haven't been completely idle with the Vlka Fenryka, and Arjac is very nearly done. Hopefully this time next week i'll be picturing him on here.

The GunGrave

Friday, 21 October 2011

Terrain: Sewage Works pt2

Yesterday i cracked on with painting my sewage works!

So here it is: Sewage Processor WT-1A!


The stencils were made by printing off the desired text in 'Stensil' font in MS Word, and then sticking them to card from a cereal box.


Once dried i cut out the text:


This was a bit fiddly, and some of the detail had to be lost:


Some of the detailing on the pipework:


The depth gauge was made from a bit of Plasticard. I also stuck some roman numeral transfers of of a IG transfer sheet!


Imperial Eagle stencil:


The contents of the container! Mmmm,, yum! Scorched Brown was applied to the whole area and then some Bestial Brown closer to the edges. The i used some of Army Painters 'Strong Tone' Quickshade on the whole area. Not only is this a dark brown wash, its also a gloss varnish! Perfect! Now I have some suitably disgusting and water-like contents!


So that's this container done! The sharp eyed of you will have noticed an additional two serial  number stencils from earlier in the post. They are intended for another two containers that i have waiting to go, and these are pictured below. They used to have liquid silicone in them for mould making! As they're a bit smaller than the one I've just made, so will make great ancillary containers!


Not sure when I'll get going on the other two containers - not to long i imagine! Anyways, i hope you all enjoy this  terrain piece!

The GunGrave

Wednesday, 19 October 2011

Terrain: Sewage Works pt1

I've decided that i need a break from the Wolves, so a bit of terrain is a good way to break up the monotony!

What we have here is a plastic chocolate container. Send it 40,000 years into the future and we've got ourselves a Gothic Sewage Works!


The image below is what i had in mind for this piece (well, one of these anyway!):


I didn't need the lid, so i binned that. On the inside were these small ridge like things that were perfect for supporting my 'water'! I used soome foamcard for this:


Next, i sealed the edges with some Milliput and smoothed down the edges with the back of a spoon. I also added some random milliput on the surface just to break up the flat area a bit.


While that was drying, i moved onto the base. I'm going to add a few bits around the edge of the main container later, so the base was made big enough to accommodate this. The container was then simply super glued to the base:


Next i moved onto the access. There will be a gantry spanning the width of the container, so i had to make some sort of ladder to reach it. I went with metal 'rungs' - quick and easy to do! I bent a bit of florists wire over a piece of wood to get the shape:


Then i stuck a load of  them up the side of the container. In order to make them stick a bit better, i drilled small holes for the rungs with a pin vice. I did the same on the opposite side of the container:


No industrial site is complete without some huge pipes! I just so happened to have a few copper pipes lying around that fitted the bill nicely!


Problem is, these things arn't cheap! When i bought these ages ago, i decided to make a silicone mould of one so i could replicate them on the cheap a bit later on.


I just cast a few more for this project!


Two pipes were stuck to the base and the side of the container; the same was done on the other side. As the container is obviously curved, the pipes don't quite sit flush with it. I'll fill the gaps later with some putty and make them into welding marks.


Now the inspection gantry. I toyed with lots of ideas here! In the end i wondered why the hell i was trying to make it more complicated for myself, and went with a simple wire mesh bridge! The frame was made out of wooden dowel with some wire mesh over the top. I haven't glued the bridge in place to make painting easier later on.


(stupid sideways! Wish Blogger would sort this.....!)

That's as far as I've got for the time being! The bulk of  the work is done, but there are a few more details, dials, and bits i want to add before i move onto painting!


The GunGrave

Monday, 17 October 2011

Vlka Fenryka - Arjac Rockfist

The man-mountain himself! Out of the handful of conversions i had to do for this army, this one excited me the most! It would also be the most difficult to get right.

That being said, this conversion was done with the minimum of fuss, mainly using existing parts from various sources. I'm very very pleased with the outcome!

Have a peek for yourselves:


I've tried to recreate this picture of Arjac from the codex:


It seems to capture him perfectly, so i wanted to reflect this in the mini itself.

Most of the parts you'll recognise from the Space Wolf Terminator sets. The shield is from Scibors miniatures with the iconography of a SW Storm Shield stuck to the front. I loved the cloak, but I didn't fancy the hanging arm of the wolf pelt on his back, so i left that off and filled the gap with Green Stuff. Some Green Stuff work was also required on the shoulder joint of the left arm to get the Storm Shield raised enough. Aside from that, no other serious conversion work was needed! Then finally, the Anvil on his back! This was a bit of a pain to decide on, but a buddy from Club suggested that i use a fantasy Dwarf banner top! Lady eBay was kind enough to oblige, and i got one for about £2. Perfect!

Just a paint job now. I really want to do this model justice, so I'll take my time with him.

Until next winter.....

The GunGrave